Showing posts with label peasant dress. Show all posts

Tuesday, 24 June 2014

Little Details...

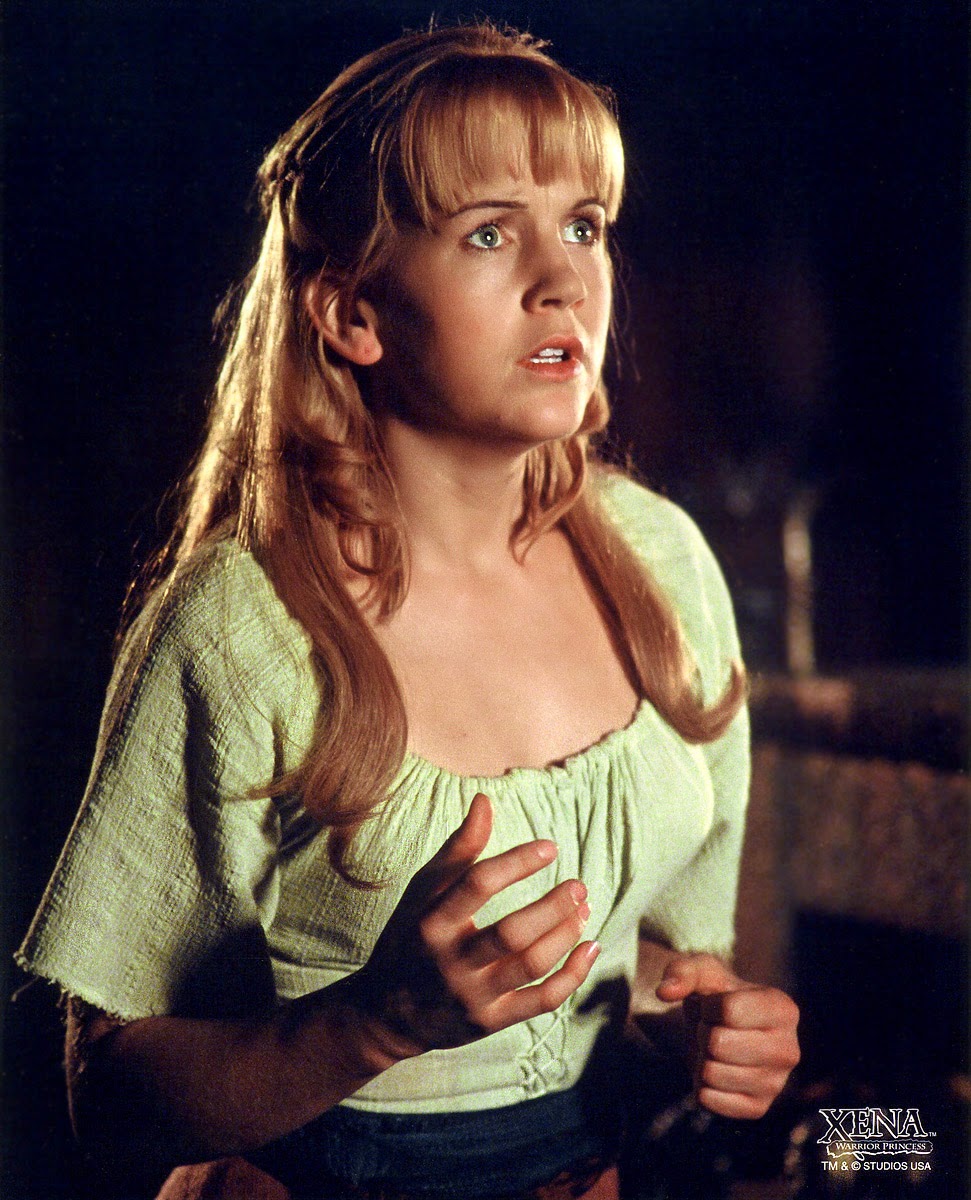
In the run up to my first Peasant Dress Shoot I had been attempting to source some suitable material for the sash around Gabby's waist. Photographs have shown it to be a very loose, open weave, like a sort of hessian sack cloth:


This was proving difficult, but with the bulk of the work done I did the shoot with a temporary sash made out of some blue linen I had lying around. But the search continued for an alternative. I had tried ordering some samples of some blue-coloured hessian fabric but was disappointed with both the colour and the texture. For a start, the only suitable blue was a dark navy which was far too bold, and the samples I received were stiff as card with no flex to them. As such I felt I would be far better off dyeing some old sacking myself.

Courtesy of ebay, I got hold of one half of a used postal sack:


This sack cloth was already way more pliant than the stuff I had tried before, and by the time I was done dyeing and washing it, I expected it would be even moreso.

To get the right shade of blue I ended up having to dye it twice. Dyeing is never an exact science, so when my first lot of Dylon 'Jeans Blue' came out a little too green, I topped it up with 'Oceanic Blue' to brighten it a tad. The end result was, I think, pretty bang on:


I am finding I am growing quite fond of dyeing my own materials for Gab. Not only is it easier to match colours this way but I'm also finding the unique blending of different colours gives the end result a unique not-off-the-peg feel and makes the material look for more natural and 'ancient' than if I had just bought a commercially dyed cloth. The finish is not quite even, not quite so 'perfect' as one would get in a shop.

The completion of the sash means I now have a complete kit for "Cradle of Hope", "Path Not Taken" and "The Titans" and another photo shoot beckons. So I'm thinking I'd quite like to make myself some lovely big 'Titans' scrolls to utilise for a shoot. And maybe do some of Gabby falling on her bum, because I'm a glutton for punishment and silly series 1 Gab is adorable in the extreme! I have already sourced wooden knobs and papyrus parchment paper for scroll-making purposes, so watch this space!


Thursday, 19 June 2014

While You Were Editing...

So while I was eagerly awaiting the arrival of my sifted and edited photographs, I decided to kill some time by starting on the green variant peasant blouse. I wasn't originally going to bother but I found some appropriate material for a cheap price at the Fancy Silks Store and decided to buy some in.

The green variant is the same style as the short sleeved blue shirt Gabrielle wears under the striped jacket, only unlike this blue version, it is worn without the jacket, making it a nice piece to have for warmer weather. It shows up in several episodes early in season one, as detailed in my Many Garbs of Gab episodic breakdown. Like the short sleeved blue shirt, this is a crinkled cotton with a gathered neckline and lacing around the waist for shaping.

In light of not being entirely happy with the shape of the sleeves on the first blouse I'd made, it was necessary to adjust the pattern slightly. I had ended up moving the sleeve seam in by a massive six inches in order to reduce the flounce of the sleeves. As I had to construct and gather the sleeves before I found out how big they were, this was a bit of a fiddle and I also couldn't reduce the amount of fabric at the shoulder.

Now I had an idea what I was aiming for from the offset, I could reshape the pattern piece for the sleeve before I started cutting or sewing.

In order to keep the right sort of shape and smooth the shoulders out, I decided to take the six inches from the top centre of the piece. I folded the pattern piece in half lengthways, measured six inches from the fold, and pinned it together at this point. This left the pattern kind of 'pointy' at the shoulder, so when I laid it out I added a bit more of a gentle curve at the top, like the original shape only narrower across the top.

I also shortened the sleeve significantly, measuring from armpit to elbow for an idea of a suitable length, making this distance out on the outer edge of the pattern piece and cutting from one side to the other following the same curve as the existing piece.

The end result was a smaller sleeve piece, less likely to bulge or billow, and hopefully about the right length to reach the crook of my elbow with a little to spare for seams and fraying.


The sleeves attached to the body as per the instructions (thankfully I hadn't had to change any seams or the reshaping would have been more complicated) and I sewed the usual 1/2 inch drawstring channel around the neckline, which was much easier without the additional channels in the sleeves to negotiate. It has to be said, in terms of simplicity, I LOVE this variant and may make another in blue just because it's so simple!


This is the basic shape of the garment, all attached and in one piece:


Nice and simple, yes?

Next, however, comes the slightly annoying and fiddley part:

To make the lacing and loops, I cut the selvedge off the fabric in long strips. A single strip would do for the lacing but I felt something a bit sturdier was needed for the loops. So I ran one through the machine, tripled over on itself, so I got a long strip with three layers of fabric. I cut this into small sections and ended up with a small collection of little ribbon bits. Like so!


These tiny, fiddly bits of cotton now have to be attached and neatly sewn into the front of the shirt in nice straight hidden channels. So I found the centre of the shirt (very important, we do not want wonky lacing!) and measured out from there so that the folded channels would be even. I then had to pin the loops into a fold of fabric so the stitching and ended would be hidden, like so:


Of course the stitching goes on the INSIDE of this top fold, right on the fold line, so I pressed the crease to make it nice and crisp before folding that layer back and re-pin it on the inside before sewing along the crease-line as best I could, and repeating on the other side:


Some of these loops have come out a little smaller than I had hoped - it's hard to tell when there's a layer of fabric covering what you're doing. Not the ones on the left, no - they just look smaller because they're sticking up.

Now for my OTHER piece of selvedge. I popped it through a darning needle and laced up the front, so now we have a nice matching lacing to go with the top! No dyeing required, it's all the same fabric.


Voila! Hopefully I can sort a photo shoot with the new variant soon. My photographer has recently been introduced to Xena and is now coming up with all sorts of ideas, like doing an iconic shot from each episode. I already have some in mind myself, but may have to get cracking on a scroll from 'The Titans' if I want to recreate my favourite shot.

TTFN!

Finished blouse.

Thursday, 8 May 2014

The Prototype Peasant Shoot

Having completed my Gabwhacker I decided to do an impromptu photo shoot in a local nature reserve. Some minor elements of the costume still needed to be perfected - I wanted to source a looser weave fabric for the blue part of the sash, and I hadn't yet had time to add the lacing to the front of the blouse - but it was nice to have so many crucial elements in place and I had a handy photographer for half a day!

It wasn't quite perfect, but it is motivating to have some nice photos to show of the look so far, and to test the wig and makeup.

I'd chosen a mid-quality fashion wig modelled on Taylor Swift of all people! It was simple, about the right colour, and had the distinctive heavy season one fringe. There was, I felt a bit too much of a curl to the tips but on closer inspection I noticed that Gab's hair does indeed have a wave to it in season one, so with just a little bit of taming Taylor wasn't far off.

For makeup I'd found this reference shot of Gab with her eyes closed showing a good level of detail. It is, let's face it, very nineties! A combination of browns and silvers on the eyelids, bit of shading over heavily plucked brows, minimal blusher, and shimmery but neutral lipstick. I had most of these in supply except for the shimmery lipstick, so I improvised with a dusky colour and then layered a paler gloss over the top.

The hardest part in the whole process, to be honest, was being able to pin the wig in place and arrange the fringe in such a way that my hairline (and roots!) didn't show though!

The overall look was definitely fairly convincing, although I did find myself scanning through the photographs and thinking my eyes looked too dark. I stupidly pondered how this had happened - I had used minimal mascara and a pale silver eyeliner - and then remembered that unlike Renee's, my eyes are actually brown. I think some pale blue coloured contacts may be on the cards to complete the look.

My perfectionist elements are also emerging as I find myself looking at the blouse and thinking the sleeves are still a tad too voluminous, especially at the shoulders, and the neckline isn't quite right. I have bought myself another peasant blouse pattern with a different neckline so may remake the long-sleeved blouse at a later date if I find suitable fabric and perhaps butcher this one to create a short sleeved variant!

All in all I like the look of the photos though. It's reassuring that I can pull off Gab and get the character across. There was a lot of playing about at this shoot, including the "hitting self in face with staff" a la "Hooves and Harlots". And yes in the interests of authenticity I really did hit myself in the face and it hurt! The aim was to have some nice pictures to show off the progress and check whether I could pull off the character. And for the most part I think we achieved that!


Click the link below to check out the shots!

Sunday, 6 April 2014

The peasant skirt - "oh bugger it!"

This just goes to show that occasionally you just need to stop trying to find something perfect and just have a go and see what you can come up with using whatever you've got!!

The search for peasant skirt fabric had proven fruitless for some time. It seems to be a bizarre kind of browny-burgundy colour (in linen, naturally) and changes depending on when you look at it.

I had already bought some linen which I found on special offer online but deemed it too pale and had subsequently set it to one side as potential series 3/4 skirt fabric. It is fairly noticeable that the skirt in those seasons looks quite a bit paler than in previous ones, so I had hoped it may yet prove useful. However, blessed as I am with online friends who possess genuine articles of screen used Gabby clothing, I decided it was best to be sure. A small sample was shipped off to the States to be compared to a costume belonging to a kindly member of the Xena Online Community forum. The photographs which appeared a week later sadly showed a marked difference:

The comparison game.
The other problem, my contact tells me, is that the original skirt is a far heavier linen than mine, so even though in certain lights the colours appeared quite close, the lighter weave of my purchased linen made it far less bold when the light hit it. This presented a big problem - not only will the colour look 'off' in photographs, it also means the skirt won't hang or flow right, which poses a problem, especially as by series 3 Gabby is quite the dynamic character and I want to be able to do a spot of stage fighting. So this brown linen was put into storage.

It wasn't until I began to realise how much dyeing would be involved in this project that I realised it still had potential. A glance at the peasant skirt in this photo by Phil Aldridge shows us just how thin the material is:

The bottom of the skirt is practically see through! So I figured that this was probably the thinnest of all Gabrielle's skirts. Combined with this image, there is also the length and the fact that the entire skirt is double-layered, so it's still going to have a fair bit of weight to it and hang quite nicely even if it is a bit on the flimsy side. So I decided, "sod it!" I would make the peasant skirt out of this stuff, throw a bit of red dye on it and see how it came out, and if I didn't like it, well it wasn't like it was fabric that's likely to get used on anything else any time soon. So, while in the process of dyeing the crossover skirt linen an attractive shade of "Rosewood Red", I threw in the peasant skirt.

The next thing was trying to decide on a pattern. Now there was the skirt pattern that came with the same gypsy costume I had used for the blouse, but the skirt for that looked far too full and poofy, even if it did come ready tailored to have two layers - like Gabrielle's. Furthermore, due to it's fullness it says it needs a ridiculous amount of material per layer and I had nothing like the amount recommended.

A quick glance at some choice shots of Gabrielle in the show give a vague clue as to how big the skirt really is. Fortunately even in these early episodes there are scenes where Gab is fairly dynamic and we can see the shape and motion of the skirt as she moves around. In this shot from 'The Reckoning', for instance:

Here we see Gab is standing astride the murder scene examining footprints. Her feet are just over shoulder width apart and the skirt hangs almost perfectly smoothly, covering her feet. There are also no visible seams in this or any other shot from the front. This shows the skirt to be a simple A-line shape, flared from the waist, most likely with only seams at the side and maybe a centre back seam. There is also noticeable in other shots a drawstring hanging from the back of the skirt showing how it is fastened.

This is a simple enough design, so I simply patterned 4 panels (front and back, shorter layer and longer layer) based simply on my own hip measurement - not waist, gotta get the thing on, remember! - for the top edge, flaring to the full width of the fabric. I cut the front panels on folds and the back panels at the edge - so it looks like this skirt's gonna have a centre back seam after all!
There's a reason I don't do graphics...
I put both layers together, then joined them at the waist. I then added a waistband, folding it over on the outside so that the drawstring will trail as it does in the show. The hem of both the longer and shorter layers is left raw and allowed to fray to give that weathered, well-travelled look.

Ancient-style clothing: distressing is your friend.


Thursday, 3 April 2014

"It looks like something dyed in there!"

So following "The Quest For the Crossover Crinkle" there came the "Dyeing of the Crossover Crinkle". Or as I like to call it, "Making the Garage Resemble an Abattoir".

The pink crinkle cotton and the burnt orange linen needed to be dyed a rusty brown, so brown dye with differing levels of reddy tones had been purchased. I had also bought myself a large plastic tub approximately the size of a small bathtub. This was actually designed for mixing plaster and was bought from a builders' supply yard! I would recommend a similar setup for anyone wishing to hand-dye material. A larger surface area always yields better results and having previously done most of my dyeing in the kitchen sink I can say the difference is noticeable.

So at the point we started at, we had two very different shades of material, shown here with flash (left) and without (right):


As I explained in the earlier post, my first step was to try and get them closer by dyeing the pink cotton terracotta and the orange linen rosewood red.

Dyeing fabric in the plaster tub was a larger scale job than my previous experiences of dyeing a tshirt or pair of shorts in the sink. For a start it can't be filled from the tap so I filled it with the necessary 6 litres of 40 degree water by filling it with two kettle loads of boiled water and two of cold tap water. Then the dye goes in, dissolved in a jug of warm water, plus a small bucket load of salt (which completely eradicated our supply and resulted in some pretty bland cooking until the next grocery shop.) Of course I also took it upon myself to spill a portion of red dye on the garage floor so when the gardeners passed through the next day they must have been convinced we were slaughtering livestock in there.

The overall result of the larger dyeing receptacle is a shallower body of water with large surface area, so the fabric can spread out and dye more evenly. I did have to fold the fabric over on itself a few times but was sure to unfold, re-fold, and rearrange the material on the surface of the water as many times as was practical so as to get the most even result.

I also threw the peasant skirt in with the rosewood for half an hour to give it a warmer tone.

The end result has evened the fabrics out considerably here shown with flash (left) and without (right):


The difference shows up a lot more with the flash on, but as this was at close quarters I decided to take another photo with the flash from a greater distance to see how it might photograph indoors at a convention or similar:

The overall effect isn't bad but the colours I think need to be browner and a little less rich. In natural light they still show up very... well, orange. The next phase will be, I think, to over-dye with a darker brown to calm them down a bit, and quite possibly get them a shade closer. I know a perfect match will be impossible but let's see what we can get with a little perseverance and another bath full of salt and chemicals!

Wednesday, 2 April 2014

The Many Garbs of Gab

It's been a stressful few weeks so in the absence of much progress I thought I'd share a little costume study for series 1.

I've already discussed the different styles of peasant shirt worn by Gabrielle in season 1, but I thought I'd do a quick episodic breakdown of the different outfits throughout the season. This first season exhibits the most costume changes for a main character, possibly because of the fairly fast evolution of Gabrielle from peasant to Amazon trainee to burgeoning warrior, and they had to incorporate those changes into her wardrobe for practical and aesthetic reasons.

The peasant dress is ditched for the shorter crossover top and matching skirt halfway through, as it would be fairly tricky for Gab to fight in a full length dress. There is, however, a prototype crossover outfit which appears only once in "Death in Chains", featuring a wider blue stripe than the standard variant, a red leather belt, and, bizarrely, the Amazonian skirt and necklace bequeathed to Gabrielle by Terreis in the subsequent episode, "Hooves and Harlots". I imagine these episodes were originally filmed with the intention of airing the other way around, but something caused "H&H" to be pushed back. Continuity issues aside, I am not particularly fond of the alternate crossover outfit. I find it a little too fussy, with the belt and the necklace overpowering the overall look, and the wider blue stripes a little clumsy on Renee's 5'4" frame. I can see why they decided to change it. Nonetheless, it's nice to see the Amazon necklace making another appearance, albeit a little out of synch with Gabrielle's initiation into the Amazons!

  1. "Sins of the Past" - Peasant dress, long sleeves.
  2. "Chariots of War" - Peasant dress, long sleeves, w/jacket.
  3. "Dreamworker" - Peasant dress, long sleeves. 
  4. "Cradle of Hope" - Peasant dress, green, short sleeves.
  5. "Path Not Taken" - Peasant dress, green, short sleeves.
  6. "Reckoning" - Peasant dress, blue, short sleeves w/ jacket.
  7. "Titans" - Peasant dress, green, short sleeves.
  8. "Prometheus" - Peasant dress, blue, short sleeves w/ jacket.
  9. "Death in Chains" -  Alternative crossover top, Amazon skirt and necklace.
  10. "Hooves & Harlots" - Peasant dress, blue, short sleeves w/ jacket, Amazon Princess kit.
  11. -  24. "Black Wolf" onwards - crossover top and wrap skirt.


Wednesday, 12 March 2014

Sleeves - decisions decisions!

With a lot of the primary construction on the peasant shirt done, I had to start thinking about which of the two sleeve styles I wanted to go with.

Gab's summer look?
Now admittedly the shorter simpler style would be a LOT easier to do, and I believe is also the one that matches up to my fabric better. However, this style is, let's face it, the more boring of the designs and is, as a result, commonly hidden under the jacket. So, much as the lazy part of me is SO tempted to lop the sleeves off at the elbow and have done with it, fact is I prefer the longer ruched sleeves. The longer sleeves are also the style more often viewed without the jacket, in several iconic moments such as the pilot episode and Renee's credit shot. The shorter sleeve style does, however, make an appearance in episodes such as 'The Titans' when Gabby wears the mint green shirt, so I may make one of these at a later date with the short sleeves, for the sake of variety.

I have stated before in my first assessment of the peasant dress fabrics that the longer sleeved shirt exhibited a geometric square design, and as such I was unable to find a close match. The fabric I have found has more of an organic linear texture to it but nonetheless I like the overall silhouette of the ruched sleeves and would like to replicate that look.

The neckline of this first variant is also a little higher, with the lacing just below, as opposed to the later designs which are lower cut with the lacing running from the waist to the bustline. The lacing on these designs also threads through small fabric loops sewn into the front of the shirt, whereas I cannot see any similar loops on the long sleeved version. I prefer the lower lacing though, so I'll be using that. If I am true to period and use cord instead of elastic around the neckline, I can keep the option of altering the neckline by tightening or loosening the cord accordingly. I may have to see what effect this has on the lacing though, as it may work without throwing off the rest of the garment.

As such I am effectively combining features of both designs - the long ruched sleeves of the first variant, and the bodice style lacing and crinkled fabric of the latter.

You may be able to see above, there are two channels running down the length of the sleeve from shoulder to cuff. I have sewn these in, as well as sewing similar channels around the neckline and cuff themselves, while being sure to leave spaces where necessary in order to thread the cord in when it arrives. The channel around the neckline is rather narrow so I have ordered the smallest cotton cord I could find (3mm) and am expecting a lot of fun(!) with a darning needle when it arrives. I may have to take the sleeves in slightly to get the right look but, again, I won't be able to tell until I put all the relevant cord in place and see how the sleeve behaves when it's all gathered together.

Overall shape of blouse so far, without cords.

Sleeve channels and neckline channel.

Meanwhile, the hunt for skirt and sash fabric continues. The viscose for the sash was a nice colour for texture wise a complete no-no, and the skirt needs a red dye throwing over it in order to get closer to the reddish terracotta of Gab's series 1 skirt. The jacket is close enough to the overall look (although it has been brought to my attention by Phil Aldridge that the actual jacket is a woven mixture of two different blues, but until I find anything closer, I am quite pleased with my current purchase) so I will be carrying on with the jacket next once the shirt is finished.

My fabrics so far - jacket, shirt, sash and skirt.


Saturday, 1 February 2014

Gabrielle Costume the First - The Peasant Dress


Now we get onto the stuff where I actually know what I’m talking about.


The costume part of this journey is a return to my roots for me, partly because sewing custom kit is what I spent ten years doing, and partly because Gab was THE first costume I ever made at the tender age of around 12 or 13. The majority of that particular costume has now been consigned to the scrap bag, and I am starting again.


It makes logical sense to start at the beginning. I like the idea of building up my collection of Gabrielle’s costumes chronologically, and also this project goes hand in hand with my long term fitness plan, and Gab’s first costume, rather conveniently, is the one that shows the least skin. This way I can start off covered and build up to the belly shirts as I build up my belly muscles. Perfect!

 So, project 1, the peasant dress. 

Peasant dress, photo by Phil Alldridge

Ever had that thing where you picture something in your mind only to realise it’s actually completely different? Well I had that with this costume. I knew I had some pale blue cotton in my stores and was already rubbing my hands with Scrooge-like glee at the thought of how cheap this dress would be. Then, as I sat down in my reams of disused material and checked my references, the fates deigned to laugh in my face once more. The blouse is not plain cotton. Oh, and there’s more than one. In fact, throughout series one I have spotted at least three different pleasant blouses.


The first, from “Sins of the Past” (and other episodes), is arguably the most iconic as it it of course features in the opening credits upon Renee’s addition to them. It appears to be made of an almost shiny/silky material and has a very distinct almost celtic-style square spiral self-pattern on it. I’m actually none too keen on this, as the silky look and clean geometric style don’t quite seem right for Gabrielle’s simple peasant life. And I’m really quite glad I didn’t like it, as I predict such a material may have been tricky to locate, resulting in a fair bit of frustration, time and expense!


Moving on, another incarnation of the dress features a rarely seen GREEN variant of the peasant blouse. 

It’s also worth noting that this variant does not have the long ruched sleeves of the first design, and instead simply has short sleeves ending at the elbow. The material appears plainer, but with a texture to it a tad more organic.


The best shot I got the blouse material up close was the following image shown below, showing a linear pattern, like a very natural grain or series of creases. I liked this style as it seemed suitably organic and so fit the time nicely.

 Entirely coincidentally, I stumbled upon a suitable match for it in my local fabric store as I wandered aimlessly between the cottons and the linens bemoaning the fact that they just didn’t have a wide enough range of natural fibers in varying tones of muddy-peasant-brown. If this material takes a dye, I can also create the green variant blouse by adding a pale lemon yellow to it.

In this shot it is also possible to see the natural, open weave of her jacket, which appears to be a very loosely woven linen, and the fraying detail of the orange and yellow trim. Ebay came up trumps for that one with a lovely teal linen for 99p for a metre and a half.

We can also see how the lacing on the front of the shirt works – threading through loops stitched into the front. The lacing does not appear to go all the way to the neckline, and the drawstring around the neckline is also tucked inside, presumably leaving less dangling cords for unfriendly warlords to grab hold of during a scrap!


Here we can also see the sleeves of the jacket, which feature the same orange and yellow banding as around the front and collar, as well as some sections in black or green. It also features black lines which appear to have been drawn or painted on, as well as paler bands which appear to be lines where the weave of the fabric is different to the main body. I may have to appliqué these but it is simple enough.Because the stripes have a slightly different weave I may be tempted to see if I can find or dye cotton tape the same shade and use those instead.

It’s a very simple cut with no fastenings and ¾ sleeves a little longer than those of the blouse. The lining shown in the picture appears to be an identical or similar colour.


I already have, a set of patterns for bolero jackets, shrugs and capes, a Butterick, code B4664, one of which is PERFECT for Gabby’s little coat with a slight widening of the sleeves.
 
The skirt and sash appear to be a soft linen or linen mix, although for the sash I am considering a viscose/raylon blend – a fabric often used for pashminas – as it has a linen-like look only without the stiffness. It’s also worth noting from the shot above that the sash has a chocolate brown trim which sometimes shows depending on how it is tied.
 

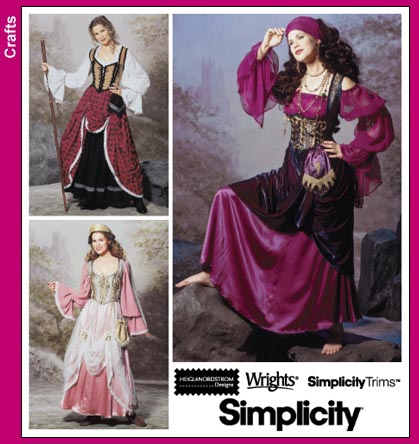
Now for the blouse pattern, I already had in my stock a Simplicity gypsy girl pattern from their fancy dress range (reference 9966 if anyone is attempting to recreate this). If you do use this same pattern I highly recommend opting for option B/C with the higher shoulder seam (pattern piece 17, rather than 3) as style A is off the shoulder (see left). You will have to amend slightly, shortening the sleeves and moving the drawstring channel nearer to the collar hemline. Fortunately I already had this pattern in stock from when I created the Snow White renegade costume from ‘Mirror Mirror’


While the hunt for appropriate skirt and sash fabrics continues, I do now have the resources to begin basic construction of both the blouse and the jacket!


So, fabrics bought, patterns chosen, let’s get cutting!

Left: jacket linen. Right: blouse cotton. Upper left corner: rejected stock cotton, now potential jacket lining.