Thursday, 22 May 2014

A Blast From the Past

I think I may have mentioned at some point that I had, in my misspent youth, made an Aphrodite costume for Starfury Decology. Well, during a closet cleanout I found it! My old original Aphrodite, held together with Wonderweb and safety pins, her flowing organza a little worse for storage. Like so many Xena costumes back then, she was made out of a bra and pants. She was quite beautiful in her hey-day, but dear old Dite is now a bit crumpled, bless her:


And then, to add insult to injury, the cat sat on her.


Clearly it just wasn't Dite's day!

Thursday, 8 May 2014

The Prototype Peasant Shoot

Having completed my Gabwhacker I decided to do an impromptu photo shoot in a local nature reserve. Some minor elements of the costume still needed to be perfected - I wanted to source a looser weave fabric for the blue part of the sash, and I hadn't yet had time to add the lacing to the front of the blouse - but it was nice to have so many crucial elements in place and I had a handy photographer for half a day!

It wasn't quite perfect, but it is motivating to have some nice photos to show of the look so far, and to test the wig and makeup.

I'd chosen a mid-quality fashion wig modelled on Taylor Swift of all people! It was simple, about the right colour, and had the distinctive heavy season one fringe. There was, I felt a bit too much of a curl to the tips but on closer inspection I noticed that Gab's hair does indeed have a wave to it in season one, so with just a little bit of taming Taylor wasn't far off.

For makeup I'd found this reference shot of Gab with her eyes closed showing a good level of detail. It is, let's face it, very nineties! A combination of browns and silvers on the eyelids, bit of shading over heavily plucked brows, minimal blusher, and shimmery but neutral lipstick. I had most of these in supply except for the shimmery lipstick, so I improvised with a dusky colour and then layered a paler gloss over the top.

The hardest part in the whole process, to be honest, was being able to pin the wig in place and arrange the fringe in such a way that my hairline (and roots!) didn't show though!

The overall look was definitely fairly convincing, although I did find myself scanning through the photographs and thinking my eyes looked too dark. I stupidly pondered how this had happened - I had used minimal mascara and a pale silver eyeliner - and then remembered that unlike Renee's, my eyes are actually brown. I think some pale blue coloured contacts may be on the cards to complete the look.

My perfectionist elements are also emerging as I find myself looking at the blouse and thinking the sleeves are still a tad too voluminous, especially at the shoulders, and the neckline isn't quite right. I have bought myself another peasant blouse pattern with a different neckline so may remake the long-sleeved blouse at a later date if I find suitable fabric and perhaps butcher this one to create a short sleeved variant!

All in all I like the look of the photos though. It's reassuring that I can pull off Gab and get the character across. There was a lot of playing about at this shoot, including the "hitting self in face with staff" a la "Hooves and Harlots". And yes in the interests of authenticity I really did hit myself in the face and it hurt! The aim was to have some nice pictures to show off the progress and check whether I could pull off the character. And for the most part I think we achieved that!


Click the link below to check out the shots!

Saturday, 3 May 2014

Team work

I haven't written as much about my running progress as I would have liked - mostly because I wasn't sure how to do so without it getting phenomenally dull: "Today I ran this amount. It was slightly more difficult than last time when I ran slightly less. Blah blah blah."

As a recap though, I have been maintaining my training since January, normally around 3 times a week, and seeking to extend the distance a little every time. I was managing this quite well, but my actual endurance for the run had plateaued at about 15-20 minutes, or about a mile and a half. After that I would have to walk for about a minute or two, then resume running again.

Fortunately, May 3rd was to mark the beginning of the GMFR training runs, organised by Sally Ellis of SE Fitness, a group which also hosts regular group runs for all ages and abilities. I hadn't run with them before - or anyone else for that matter! - so when I turned up on the day I was asked whether I was running or walking the route. Indecisive and self-depreciative as ever, I mumbled that I was hoping to run it but I was struggling to run further than a mile and a half without taking a little break. They made the call for me - I was to run the full 5.5 miles that morning with the intermediate group at a steady pace of 11-12 minute miles. My fate was decided!


There were quite a lot of people at the run, of many different speeds and abilities. Although we all set off together the group soon spread out and runners settled into smaller clusters with those of a similar pace. The main leader for the 11-12 minute mile group offered up various snippets of advice regarding pace, posture and breathing. I got the impression from the pace we were keeping that perhaps I had been pushing myself a little too hard in my solo runs which was contributing to my inability to maintain the pace. Most of all though, it has to be said that the process of running alongside others is extremely motivating and prevented me from falling into my usual pattern of slowing to a walk every now and then. I was able to keep running and maintain a steady pace, steady breathing and even carry on a conversation, and I returned to the meeting point alongside one of the 11 minute mile pacers - a proud accomplishment!

As such I made the decision to continue my training with the group from now on. Even though there was no group meet on the following Monday, my 4 mile solo run was completed at a consistent pace simply due to the knowledge that I COULD go the distance without a break.

Running with that extra boost of confidence and motivation felt like flying. It's amazing what you can accomplish with the right encouragement.


Thursday, 1 May 2014

One month to go!

Oh crumbs! Only one month until the GMFR - which I have just been reliably informed is in fact 13.5K and not 10K as I initially thought. I'd love to make the £100 target but I still have a long way to go. Please check out my fundraising page. Alzheimers Research UK is a charity close to my heart for deeply personal reasons.


Monday, 14 April 2014

Toys!

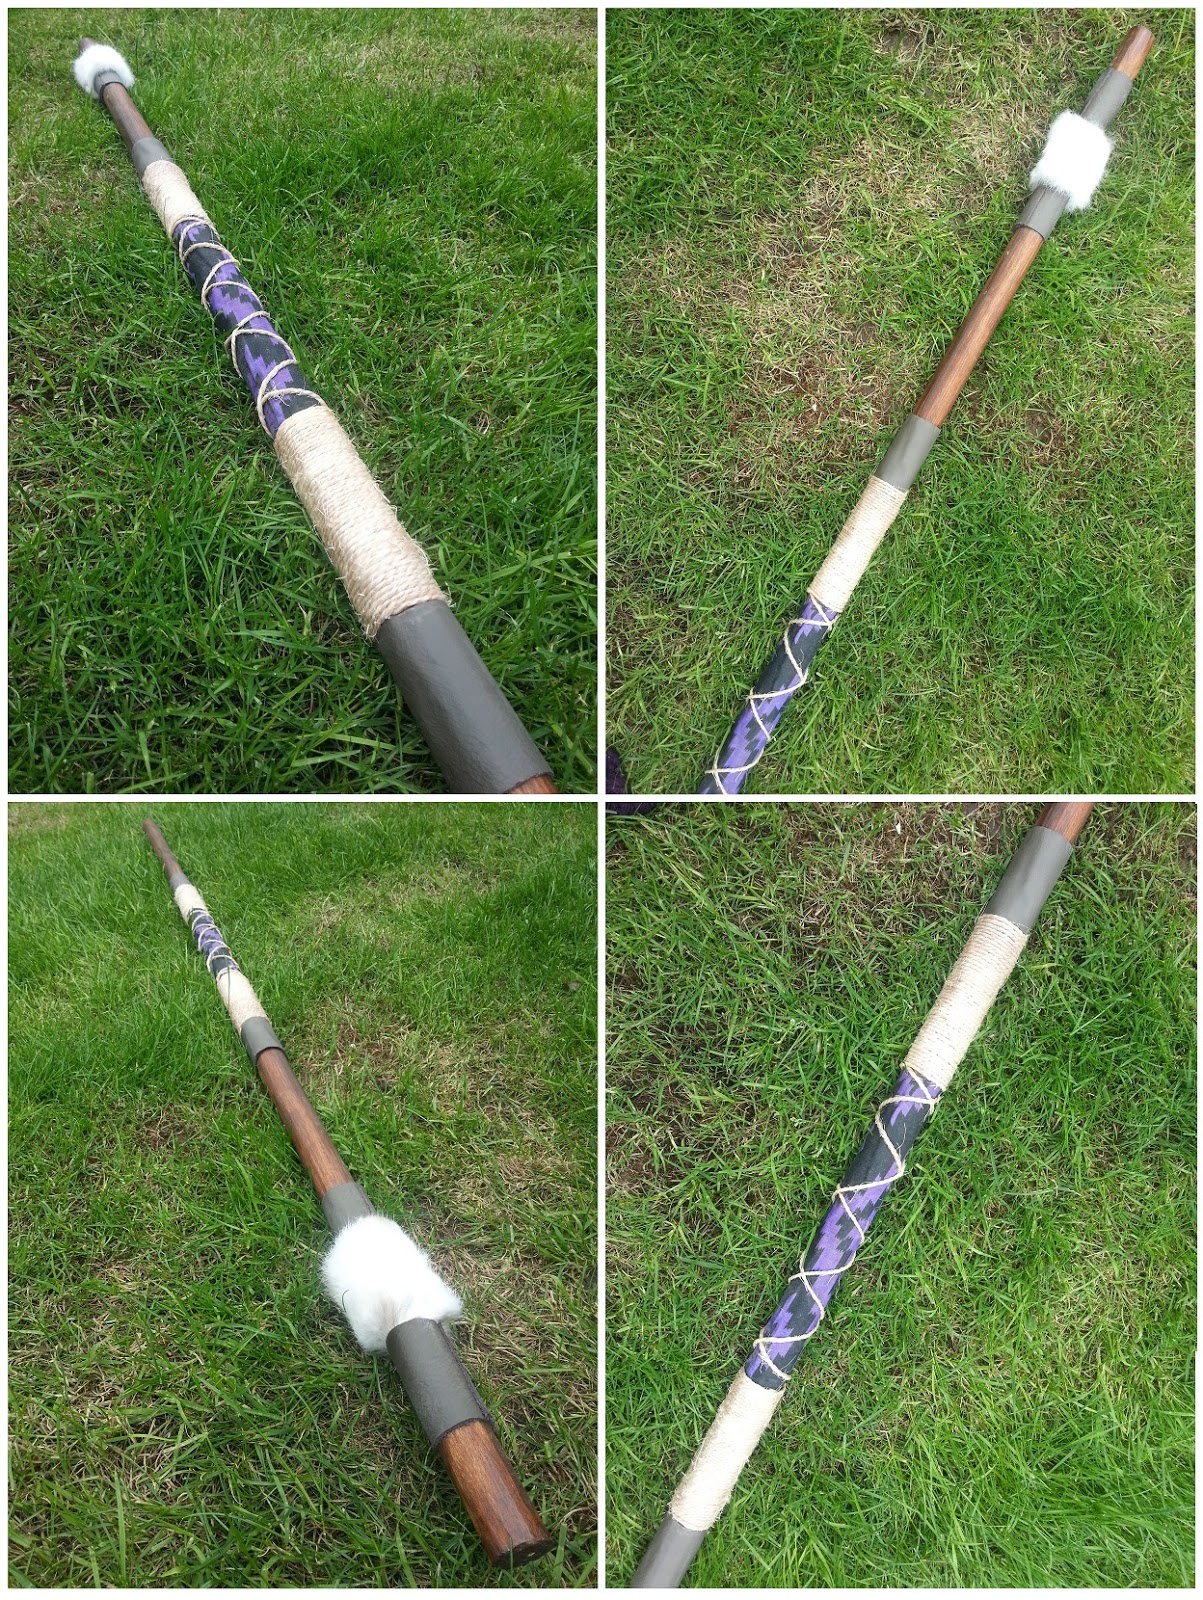
The second week of April was spent planning, building and finishing of the Gabby stick. I had acquired a 1.25" diameter length of dowl - the closest the local timber mill offered to any of the widths suggested online - and got some very curious looks taking it on the bus!

The reference I was using for the build was Jim Yuen's "GabWhackers: A Comparison" which features dimensions for three different replica staffs - the Creation Official, WarriorNutCase, and Soundwarrior. The table of dimensions and colours would ultimately prove invaluable, but would inevitably be deviated from as I tried to adjust my custom staff to my own height.


For the wraps and grips, I purchased some cheap leather offcuts, cream garden twine, some purple and black cotton with a tribal print, and in the absence of anyone selling fake fur in anything smaller than a meter, a white anorak trim which would have to be unpicked and flattened to be wrapped around the neck of the staff.


One thing worthy of note with regards to the soft materials is that the design of the staff varies throughout the show. Gabrielle's early staff appears to feature a fluffier fur and darker leather, while series 2 and onwards veers towards tan with a flat creamy-yellow goat hide or similar instead of the fur. I may very well create a second staff for my series 2/3 costumes and follow this design, as well as attempting to get a custom print cotton to match the fabric wrap, which, as Jim points out, is the same material as the prayer scarf she finds in the market in 'Blind Faith'. So far this is the only photo reference I have of this material so if anyone has any higher quality shots or scans of the fabric, do please let me know as GabbyStick mkII shall have the exact material if it kills me!

The first step was trimming and shaping the dowl. I decided because of my height I wanted to make my staff relative to the extra four inches I have on Renee. She's 5'4" and I'm 5'8" - so if we assume the 64.5" official staff is accurate (we're assuming a lot here but this is all I have to go on) I can work out a suitable length using simple ratios. For anyone who doesn't remember GCSE mathematics, or perhaps never did ratios, here's how this works:

5'4"  = 64", so that's basically a ratio of 1:1 (one inch of staff to every one inch of actor) plus half an inch. So if I make mine 68.5" then that's going to be as near as.

Or alternatively:


  64.5
 /64
  =1.0078125
x68
=68.53125

Class dismissed. Remember to bring your homework.


Boring part done, let's say 68.5 and call it a day. So we lopped the excess off with a saw. Next I had to flatten down the smooth curves sides of the dowl with an electric sander. I wasn't going to aim for the octagonal shape of the official staff, as this would have reduced the diameter by too much and been quite difficult for someone like me who has no real woodworking experience. I just wanted to give it a raw, uneven finish so it looks hand carved and a little bit "rough and ready".

The easiest and quickest technique for this was to grip the dowl in a Workmate and run an electric sander up and down to shave off the smoothness. This was done in about 20-30 minutes with minimum sweat and a lot of sawdust. The end result, as you can see, a not-quite octagonal look but certainly a dowl with flatter sides as if hand shaved.

I left the surface as it is without further hand-sanding, as the rougher finish will show up better under a coat of woodstain.


"You can do it if you B&Q it!"
For colour, I wanted an oak woodstain with a matte finish. There are no glossy varnishes in ancient Greece after all! I used a nice cheap B&Q own-brand wood stainer, partly because I am a tightwad and partly because I don't really want a professional-looking even finish - I wanted a finish that looks liked Gabby rubbed it down with some oil while sitting by the fire in a wood somewhere. It only came in satin, but with the rough unfinished wood surface it wouldn't show up with too much of a shine, and at half price it was only £2.58 for a 250ml tin! Perfect for my little stick!


In order to prevent getting stain on my fingers - or fingerprints on my stain - I hung the staff from the washing line using a nail and a bit of wire. I hammered a nail into one end of the staff, bent it with pliers to a 90 degree angle, twisted a loop of wire over the washing line and hung the staff from it. This meant I could paint the stain onto the wood without ever having to touch the tacky surface.

It was at this point with the stain going on that I was suddenly able to see the areas which I had missed with the sander - long strips of smoother, treated wood where the stain did not take to quite such a deep colour. This wasn't a bad thing though. The varied, uneven effect on the colour gave a natural finish, highlighting different faces of the wood to enhance the hand-carved look I wanted to create. Many of these little areas were fine lines in between the sanded faces of the staff, giving a nice effect.


Once the stain was dry, the wrapping could be applied. Jim's measurements for the different staffs differ greatly but I decided to use the official staff as my basic guide. As this was intended to be a series 1 staff, I noted that the biggest difference aside from the colours and the fluffier fur was that the leather pieces were bigger. As such, the easiest way to extend the dimensions of the Creation staff to fit mine was to simply make all those leather pieces 3 inches instead of 2. I also wanted to even out the grips so the staff was symmetrical, and so (ignoring the .25 on the upper grip as this isn't even included in the total) I evened the two grips out to 4.75 inches each.

I applied the fabric first, using PVA glue on the majority then super-glue to secure the edges, then measured to find the centre point. 4.5 inches either side of this I marked the beginning of the grips, then 4.75 further still marked the leather.

I cut the leather into 3" strips and applied them also with PVA and a little super-glue. I could now start applying the twine. The spiral binding requires TWO pieces going in opposite directions so I cut two long pieces of twine, secured each at the end near the leather and began to wrap. With each circuit around the wood I secured the twine with a spot of superglue. Once the required 4.75 inches was covered, I began the spiral wrap. Here the twine was also secured at the points where it met and overlapped the twine going the other way, and once I reached the grip at the other end I trimmed and tucked the end into the corner where grip meets spiral, and secured with a a little glue, as shown here.

Anorak trim comes pre-prepared with cotton tape carefully
designed for application onto anoraks. Needs to be carefully
removed for application onto anything else.

The fur and leather at the top is far simpler. Again I cut two strips of leather 3" long and, leaving a 2.5" gap at the top, secured them to the wood with PVA leaving a 3" gap in between. I wanted to make sure the fur was the last piece to be applied so as to avoid getting glue on it, as this would be the part which would show up the most if I did! Being an anorak trim, I had to unpick and remove the cotton tape from the back, leaving a strip of backed fur about 1" wide. In order to create a smooth top and bottom edge to the fur section, I had to trim this strip to a point at the end. Word of note: when trimming fur, be sure to push the pile AWAY from where you are cutting, otherwise you may end up with dodgy looking short, blunt fur near the trimmed edge. I wanted to avoid messy splodges of PVA when it came to the fur, so the whole thing was applied with little dots of super-glue and carefully held down in tiny stages. In the end I glued the fur in about ten separate points, making sure each one was secure before moving on and glueing the next bit.

Grubbification!
Once the textiles were secure I could set about weathering them - also known as "making it look like it's been dragged through the mud a bit". For this I mixed a couple of shades of brown acrylic and watered them down so I could put a muddy brown wash over the twine, giving it darker patches. I also used a weathering spray in a dirty grey-brown to dull the brilliant white of the fur in places, and sandpapered the leather in spots to make it look scuffed and battle worn.

The finished staff looks pretty close to the series 1 version, as well as having a nice authentic "homemade" look. More photos to follow when I take both my finished costume and hittin' stick out into the woods for a photo shoot! In the meantime though, here's some shots of the staff. I'm pretty proud of this one - but as always I know what I can do to make it better!


Monday, 7 April 2014

GMFR Fundraiser

Just a quick post: not long now til the 10K and I've done a donation page. I'm on about 6.5K a day right now 3 days a week so way ahead of schedule. All donations for the charity run are gratefully received:


Peace out xx

Sunday, 6 April 2014

The peasant skirt - "oh bugger it!"

This just goes to show that occasionally you just need to stop trying to find something perfect and just have a go and see what you can come up with using whatever you've got!!

The search for peasant skirt fabric had proven fruitless for some time. It seems to be a bizarre kind of browny-burgundy colour (in linen, naturally) and changes depending on when you look at it.

I had already bought some linen which I found on special offer online but deemed it too pale and had subsequently set it to one side as potential series 3/4 skirt fabric. It is fairly noticeable that the skirt in those seasons looks quite a bit paler than in previous ones, so I had hoped it may yet prove useful. However, blessed as I am with online friends who possess genuine articles of screen used Gabby clothing, I decided it was best to be sure. A small sample was shipped off to the States to be compared to a costume belonging to a kindly member of the Xena Online Community forum. The photographs which appeared a week later sadly showed a marked difference:

The comparison game.
The other problem, my contact tells me, is that the original skirt is a far heavier linen than mine, so even though in certain lights the colours appeared quite close, the lighter weave of my purchased linen made it far less bold when the light hit it. This presented a big problem - not only will the colour look 'off' in photographs, it also means the skirt won't hang or flow right, which poses a problem, especially as by series 3 Gabby is quite the dynamic character and I want to be able to do a spot of stage fighting. So this brown linen was put into storage.

It wasn't until I began to realise how much dyeing would be involved in this project that I realised it still had potential. A glance at the peasant skirt in this photo by Phil Aldridge shows us just how thin the material is:

The bottom of the skirt is practically see through! So I figured that this was probably the thinnest of all Gabrielle's skirts. Combined with this image, there is also the length and the fact that the entire skirt is double-layered, so it's still going to have a fair bit of weight to it and hang quite nicely even if it is a bit on the flimsy side. So I decided, "sod it!" I would make the peasant skirt out of this stuff, throw a bit of red dye on it and see how it came out, and if I didn't like it, well it wasn't like it was fabric that's likely to get used on anything else any time soon. So, while in the process of dyeing the crossover skirt linen an attractive shade of "Rosewood Red", I threw in the peasant skirt.

The next thing was trying to decide on a pattern. Now there was the skirt pattern that came with the same gypsy costume I had used for the blouse, but the skirt for that looked far too full and poofy, even if it did come ready tailored to have two layers - like Gabrielle's. Furthermore, due to it's fullness it says it needs a ridiculous amount of material per layer and I had nothing like the amount recommended.

A quick glance at some choice shots of Gabrielle in the show give a vague clue as to how big the skirt really is. Fortunately even in these early episodes there are scenes where Gab is fairly dynamic and we can see the shape and motion of the skirt as she moves around. In this shot from 'The Reckoning', for instance:

Here we see Gab is standing astride the murder scene examining footprints. Her feet are just over shoulder width apart and the skirt hangs almost perfectly smoothly, covering her feet. There are also no visible seams in this or any other shot from the front. This shows the skirt to be a simple A-line shape, flared from the waist, most likely with only seams at the side and maybe a centre back seam. There is also noticeable in other shots a drawstring hanging from the back of the skirt showing how it is fastened.

This is a simple enough design, so I simply patterned 4 panels (front and back, shorter layer and longer layer) based simply on my own hip measurement - not waist, gotta get the thing on, remember! - for the top edge, flaring to the full width of the fabric. I cut the front panels on folds and the back panels at the edge - so it looks like this skirt's gonna have a centre back seam after all!
There's a reason I don't do graphics...
I put both layers together, then joined them at the waist. I then added a waistband, folding it over on the outside so that the drawstring will trail as it does in the show. The hem of both the longer and shorter layers is left raw and allowed to fray to give that weathered, well-travelled look.

Ancient-style clothing: distressing is your friend.